Finger Controls
If your character does not have all their finger joints start with the left hand.
Making the finger joints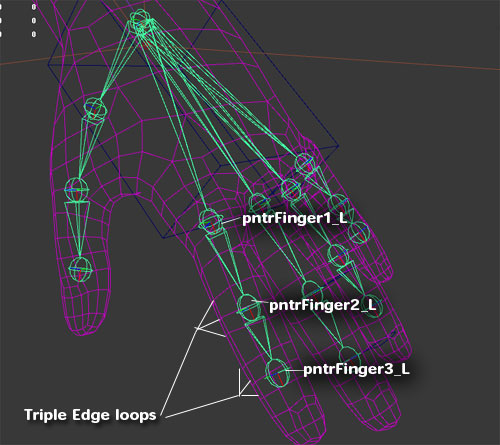
1. Copy the wrist joint and position it at the first knuckle of
the pointer finger
2. Name it
pntFinger1_L and
parent it to the wrist
joint.
3. Duplicate the joint, position it at the second knuckle and name it
pntFinger2_L repeat for the third knuckle.
4. Position the joints so they are in the middle of the finger
geometry, also notice that there are three edge loops for the
2nd and
3rd knuckle of each finger, make sure each joint is placed at the
center loop.
5.
Modify>Freeze transformations on the joints
6. Use
skeleton>orient joints to orient the joints so X is pointing
to the next joint and so Y is pointing to the back of the character
(this is so positive y rotations curl the fingers into the hand)
7. Make sure that the Y axis is aligned with the palm of the hand
TIP! To modify the orientation of a joint directly. Select the joint and open the attribute editor (ctrl+a). Under the joint category locate "Joint Orient" The
three values are for X Y Z rotations of the joint. Click in the
number field you want to change and with the mouse cursor over the
field hold down the ctrl key and Middle Mouse Button and drag left and right to change the value.8. Copy this first finger and use it to make all the remaining fingers. Make sure you orient these and freeze transforms
(On the thumb make sure to line up the y axis with the natural angle of
the thumb)
9. Change the name prefixes on the joints to the following
thmb pntr mid rng pnk.
10. Before moving on check that all rotations on the joints are zero and all orients are correct.
Creating the Finger Controls1. Select nothing and press ctrl+g to make an empty group at the origin.
2. Name this group
pntrFinger1_pos_L.3. Select the
pntrFinger_L joint then the
pntrFinger1_pos_L group and run the
following mel command.
delete `parentConstraint` (this will snap the
pivot of the group to the selected joint)
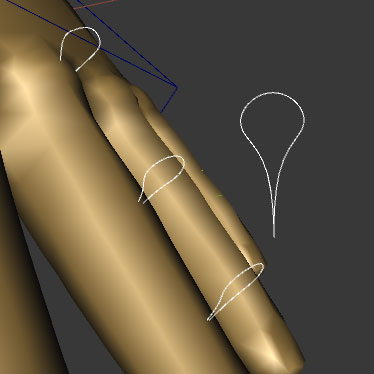
4.
Create>nurbs object>circle and shape it like a lollipop.We will use this as a controller for the fingers
5. Parent this object to
pntrFinger1_pos_L 6. Set all
trans and rot values to zero.
7. Rotate it so it sticks out of the
top of the finger and then freeze transformations on it.
8. Name this control
pntrFinger1_ctrl_L 9. Select the control and press
ctrl+g and name the group
pntrFinger1_sdk_L
Now we have an sdk (set driven key) control group that we can use to drive the fingers but still allows us to use the nurbs controls as well.
10. Now we can duplicate
pntrFinger1_pos_L and use it for
the next joint of the finger by zeroing the trans and rot values then run
delete 'parentConstraint'
Repeat this process for the other two knuckles on the pntrFinger making sure to update all names on these new nodes
11. parent
pntrFinger2_pos_L to
pntrFinger1_ctrl_L
And parent
pntrFinger3_pos_L to
pntrFinger2_ctrl_L
12. Lastly
parentConstrain the
pntrFinger joints to their respective controls.
 Final hierarchy for midFinger controls
13. Copy the pntrFinger hierarchy and rename to the next finger control you need ie (rngFinger) using
Modify>Search and Replace Names14. To place these copied nodes select all the *pos_L nodes and
type 0 into the translate and rotate channels. Then use the
delete `parentConstraint` command on each *pos_L node to align it with it's corresponding joint (see step 3 for details).
15. Once all the individual finger control hierarchies are made we group them with the hand_ctrl_L and call the group
hand_system_L Now we Add Set Driven Keys to control the fingers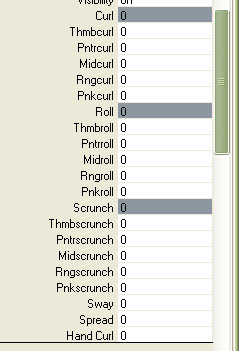
1. The drivers for these SDKs are attributes that we add to
hand_ctrl_L.
The above image shows the hand attributes we need to add.
All of these attributes should have the following options Min: -10 Max: 10 Default: 0 The
driven attributes will be the *sdk groups NOT the controllers. The
easiest way to select these is to select all the nurbs controllers for
the fingers then hit the up arrow to select the SDK group. Curl: + curls the fingers toward the palm of the hand - curls fingers upwardSpread: + spreads the fingers apart - pushes the fingers togetherSway: + Curls the fingers forward - Curls the fingers backwardsRoll: + twists the fingers forward (X axis) - twists the fingers backward (X axis)Scrunch: + Pushes the finger tips towards the palm - Extends the finger tips upwardsSee the hand attrs in this
video
Mirroring the Hand Ctrls 1. All of the finger_pos_L groups should be parented to the hand_ctrl_L.
2. Select hand_ctrl_L and group it and name the group hand_system_L.
3. Duplicate this and rename it hand_system_R
4. set scale x to -1 on hand_system_R
5. Freeze Transformations (scale only) on hand_system_R.
6. Search and replace names so the controls all have _R in the name,
Now you have all the controls in place on the right hand6. Mirror over the left arm from the clavicle using skeleton>mirror joint
Options: Mirror behavior
replace; _L with _R
7.
unparent the wrist on this new right hand and parent it to the original
arm and delete the unused arm joints we just mirrored over.
8. unparent pntrFinger1_ctrl_R from the hand_system_L while we orient it's parent groups.
9. select
pntrFinger1_R then
pntrFinger1_ctrl_R then run
delete `parentConstraint`;10. parent
pntrFinger1_ctrl_R back under
pntrFinger1_sdk_R and unparent the child of
pntrFinger1_ctrl_R11. Freeze Transformations (Trans Rot Scale) on
pntrFinger1_ctrl_R.
Rinse and repeat for all remaining finger controls on the right hand