An IK spine will allow an animator to animate the hips while the chest stays stationary and vice versa. This is very useful and fast for animating characters in many different situations.
See an example of the spine in action: Spine_movie
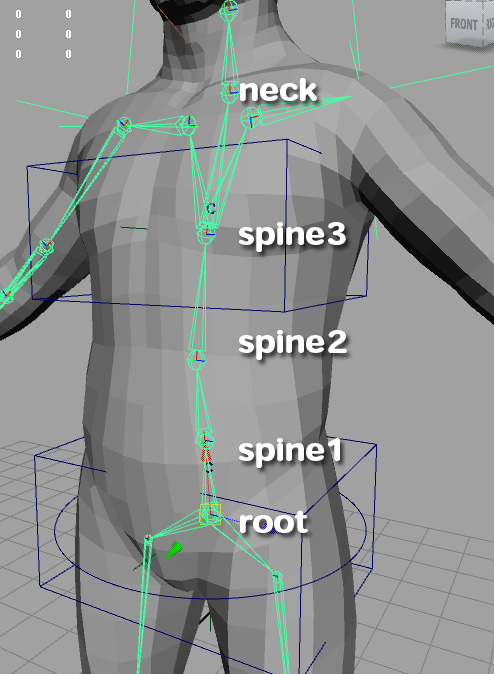
Your spine should look similar to the image above. You should have a total of 5 joints up the spine including the neck.
Before you start you should make sure your joint orients are correct and all rotation values are zero.
1.Go to Skeleton>IK spline handle tool (options) and set the options according to the image

2. Next click on the root bone then the neck bone to create the spline IK handle
3. Rename the new handle to spine_IKhandle. Name the new curve that was created spine_curve
and in the attribute editor uncheck the box inherits transform
4. Open the attribute editor (ctrl+a) and set the attributes on spine_IKhandle to the following
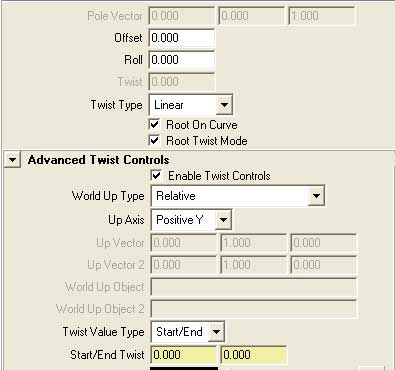
Enabling the Advanced twist controls allows us to twist the start and end of the spine independently
5. Select spine_curve and hit F9 to go into vert selection mode
6. Select the top half of all the verts in the curve and go to create deformers>cluster name the cluster chest_cluster
7. Now select the bottom half of all the verts in the curve and go to create deformers>cluster name the cluster hip_cluster.
8. Make two nurbs control boxes and snap them at the root and spine3 joints
(see Triple Arm Control tutorial for how to make nurbs controls)
9. Name the top one chest_ctrl and the bottom one hip_ctrl
10. Freeze Transformations on the two new controls and delete history.
11. Parent the hip_cluster to the hip_control and the chest_cluster to the chest_control.
Now if you move and rotate the controls you will notice that the chest and hips should move and rotate with the controllers. But, if you twist along the Y axis nothing happens, to fix this we will now connect the spline IK twist controls.
12. Create a locator and name it hipTwist and snap to the root bone.
13. Create a locator and name it chestTwist and snap to the spine3 bone
Now we will connect these locators to the spine_ikHanndle twist values using the connection editor.
14. Open the connection editor window>general editors>connection editor
15. Connect the hipTwist "RotateY" value to spine_ikHandle "dTwistStart" (You can find dTwistStart under dTwistStartEnd)
15. Connect the chestTwist "RotateY" value to spine_ikHandle "dTwistEnd"
16. Select hip_ctrl then hipTwist and constrain:parent
Now when we twist the hip_ctrl it will twist the locator which will drive the spine twist start value
17. Select chest_ctrl then chestTwist and constrain:parent
18. Now select hip_ctrl and chest_ctrl and parent them to root_ctrl
Done! Now wiggle the chest and hip controls and try them out!!!