arm_tutorial
This
tutorial will create an arm system that will let you switch between FK
and IK on the arms of your character. Before you start this lesson you
must make sure you have Straightened the arm joints for IK, and that
you have zero rotations on the joints and that your joint orientations
are correct..
1.Duplicate (CTRL + d) your arm joints twice and delete any joints past the wrist, or extra twist joints.
2. Add "IK" and "FK" to the joint names.
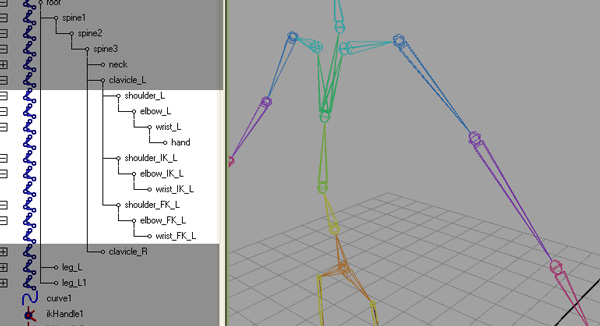
3. Add an IK handle to the IK arm skeleton>IK Handle and name it "arm_ikHandle_L". (hide the other two arms first to make this easier)
NOTE: In the attribute editor change the IK handle attribute "Stickiness" to sticky.
4. Select shoulder_FK_L shoulder_IK_L shoulder_L: then click constrain>orient
Select elbow_FK_L elbow_IK_L elbow_L: then click constrain>orient
5.
Add an attribue to your root controller. (Usually the root controller
is the controller attached to the root of the skeleton or the pelvis)
Select the root controller then in the channel box right click>Attributes>Add Attribute..
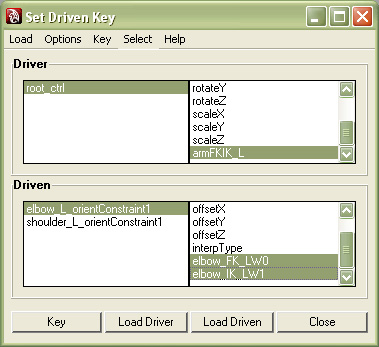
Open the Set Driven Key window: animation>set driven keys>set...
Select the root controller and click "Load Driver"
highlight the "armFKIK_L" attribute
The "armFKIK_L" attribute on the root_ctrl should be set to 1 in the channel box (which means IK Mode)

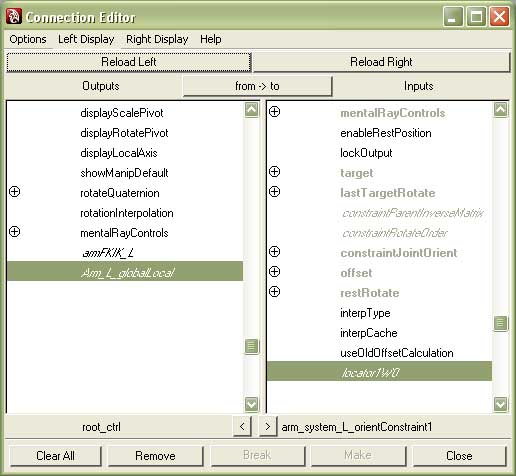
Select all the orient constraints (elbow_L_orientConstraint1, shoulder_L_orientConstraint1) under the original arm, then in the set driven key window click "Load Driven"
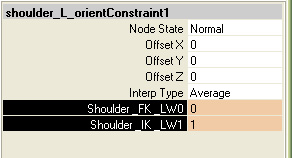
The orient constraints which can be found under the original arm all need to be set to IK as well
To do this select the constraint then set the FK: to 0 and the IK: to 1 like in the image below.
Now back in the Set Driven Key window select an orient constraint and it's last two attributes and hit "key" do this for both the orient constraints in the driven window.
Set the root control attribute "armFKIK_L" to 0 (FK mode) and
set all the constraints to FK: 1 and IK: 0
Now you want to go back to the set driven key window and key the orient constraints again.
Now we will separate these new joints out of the bind skeleton
7. Unparent these joints using (Shift+p):
"shoulder_IK_l, shoulder_FK_l "
8. Then group them (ctrl+G) and name the group "arm_system_L"
9. Move the pivot of the new group (insert key) to the shoulder joint.
Create a locator create>locator and name it shoulder_L_ori.
10. Parent (p) the locator to the clavicle_l joint and move it to the shoulder joint (v) then modify> freeze transformations.
11. Choose "shoulder_L_ori" then "arm_system_L" and do a
constrain>point and
constrain>orient
Now you have the control joints out of the bind skeleton. This is
important so that these extra control joints don't affect the skinning
of meshes. Basically, we don't want to skin to control joints.
12. So now you reskin the mesh to the skeleton
and load your previous weights.
Now we need to add one last attribute to the root_ctrl that will allow us to globally orient the arms
1.
Add an attribue to your root controller. Select the root controller then in the channel box right click>Attributes>Add Attribute..