Mouth Controls Part 1In
this tutorial we will create the mouth joints and skin them to the
head. We will also create a control hierarchy which will allow us to
manipulate the joint directly as well as using a UI for posing the
mouth.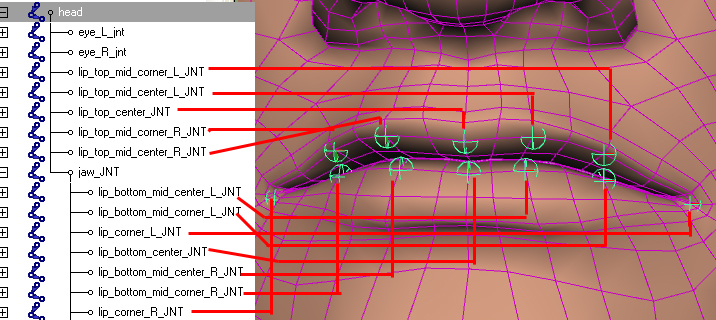 1.
Create all the lip joints, they should be oriented to the world. It's
easiest to just create one joint and keep duplicating and renaming,
snap them to verts on the lips to place them.2.The
jaw joint should be placed in the middle of the head (from the front)
and just in front of the ear canal (from the side)
1.
Create all the lip joints, they should be oriented to the world. It's
easiest to just create one joint and keep duplicating and renaming,
snap them to verts on the lips to place them.2.The
jaw joint should be placed in the middle of the head (from the front)
and just in front of the ear canal (from the side)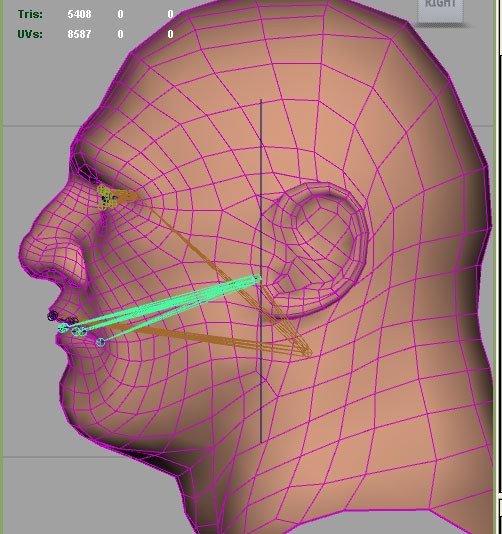 3.
To begin skinning first select a vert in the middle of the jaw and
expand the selection by pressing ( > ) repeatedly. Then assign those
verts to the jaw. Assign the whole lower lip to the jaw to get
started then open the jaw a little bit to start painting weights on the
individual weight joints.4.
If you had previous weights on the head, you can just select the head
geo, then shift select all the new joints, and go to skin>smooth
skin>add influence options and make sure you click lock weights.
Then when you go to paint weights turn off "hold" on all the new joints
you added.5. Now we will make the controller hierarchy, first make a small nurbs sphere and snap it to the origin.
3.
To begin skinning first select a vert in the middle of the jaw and
expand the selection by pressing ( > ) repeatedly. Then assign those
verts to the jaw. Assign the whole lower lip to the jaw to get
started then open the jaw a little bit to start painting weights on the
individual weight joints.4.
If you had previous weights on the head, you can just select the head
geo, then shift select all the new joints, and go to skin>smooth
skin>add influence options and make sure you click lock weights.
Then when you go to paint weights turn off "hold" on all the new joints
you added.5. Now we will make the controller hierarchy, first make a small nurbs sphere and snap it to the origin.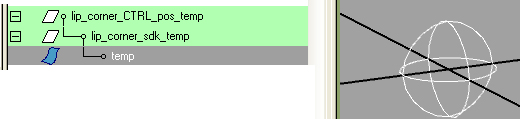 6. Name it "temp" and group it twice and name the groups as shown above.7.
Select the jaw_jnt and all the lip joint and run the following script.
This will create control groups and attach them to each joint.
6. Name it "temp" and group it twice and name the groups as shown above.7.
Select the jaw_jnt and all the lip joint and run the following script.
This will create control groups and attach them to each joint. string $mySel[]=`ls-sl`;
for($i=0;$i<size($mySel);$i++)
{
float $myPos[]=`xform -q -ws -t $mySel[$i]`;
$name= `substitute "_JNT" $mySel[$i] "_pos"`;
$name2= `substitute "_JNT" $mySel[$i] "_sdk"`;
$name3= `substitute "_JNT" $mySel[$i] "_CTRL"`;
duplicate -n $name lip_corner_CTRL_pos_temp;
xform -ws -t $myPos[0] $myPos[1] $myPos[2] $name;
rename ($name + "|lip_corner_sdk_temp") ($name2);
rename ($name2 + "|temp") ($name3);
parentConstraint -mo $name3 $mySel[$i];
makeIdentity -apply true -t 1 -r 1 -s 1 -n 0 $name;
}
8. Select the jaw controller and hit f9 and scale it large enough so it sticks out the sides of the head.9. Parent all the lower lip "pos" groups under the jaw_ctrlBefore proceeding move all the lip joints around and test the skin weights and adjust them until they move satisfactorily.Now let's make a box controller for the face UI.10. Create a nurbs circle at the origin rotate X=90 and freeze transforms. This will be the ctrl_slider.11. In the attribute editor limit the Trans X and Y from -1 to 1 and limit the Z from 0 to 012. Create a nurbs circle with 4 sides and "linear" to make a box. then rotate into place and freeze transforms.13. Snap this box to the origin and freeze transforms.14. Move the ctrl_slider circle to x=1 y=1 and scale the box so the circle sits just within the box.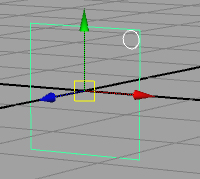 15. Group the box and slider and name the group "mouth_UI_pos"16.
Now move this group to the side of the head and lock up selectability
and channels like we did with the eye UI in the previous lesson.17. Now connect the control using Set Driven Keys in Animate > Set Drviven Key > Set...See the Maya manual if you need a refresher on Set Driven Keys or see the hand tutorial18. Set the slider as the driver, and select the jaw sdk group along with all the lip sdk groups and set them as driven.19. Use the image below for the key poses, remember ONLY MOVE THE SDK groups not the controls themselves!!!
15. Group the box and slider and name the group "mouth_UI_pos"16.
Now move this group to the side of the head and lock up selectability
and channels like we did with the eye UI in the previous lesson.17. Now connect the control using Set Driven Keys in Animate > Set Drviven Key > Set...See the Maya manual if you need a refresher on Set Driven Keys or see the hand tutorial18. Set the slider as the driver, and select the jaw sdk group along with all the lip sdk groups and set them as driven.19. Use the image below for the key poses, remember ONLY MOVE THE SDK groups not the controls themselves!!!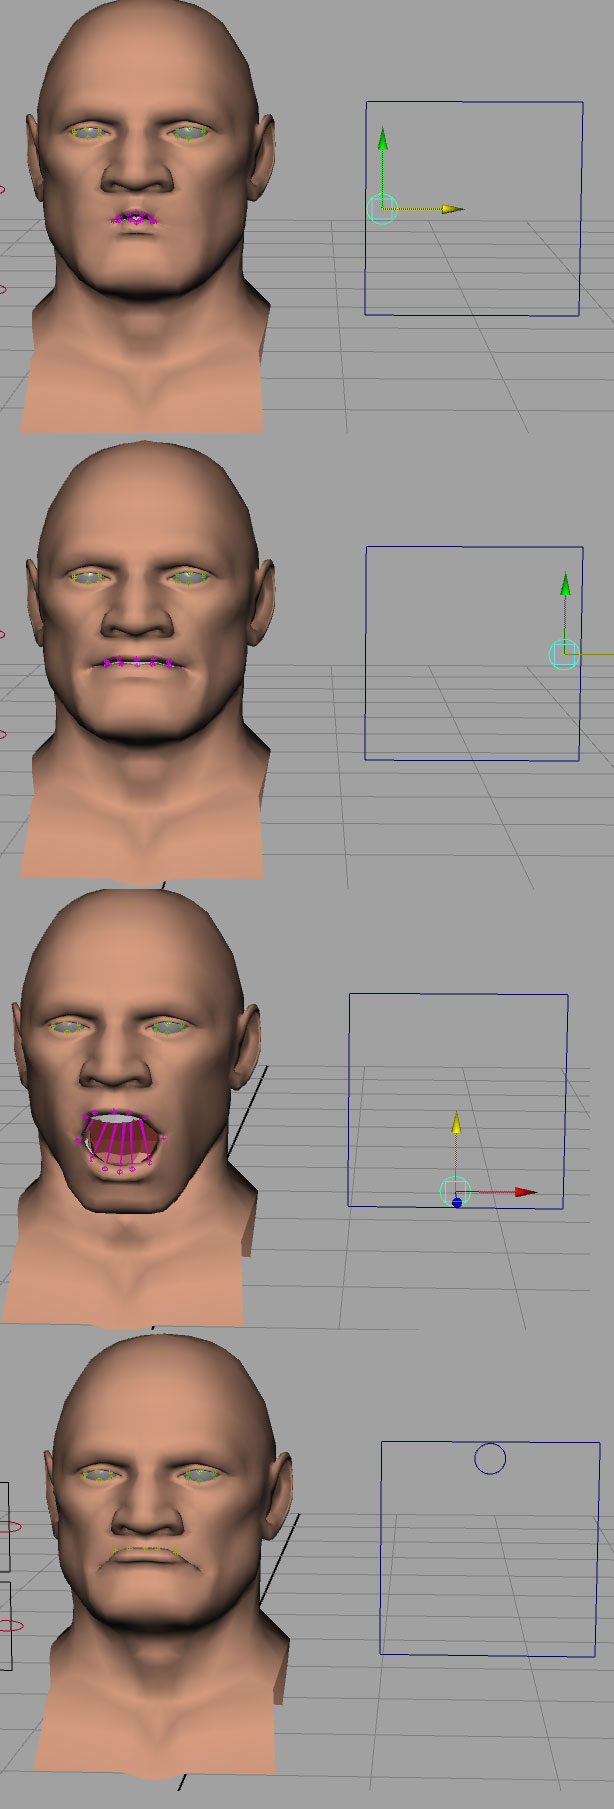 Now play with your cool new control!Now go eat a snack!